How To Submit Your App To the App Store?


Finally, after putting a lot of effort into developing an iOS app, you are now ready to submit your app to the App Store.
Well, it is certainly an exciting phase for which you have been waiting since you started your iOS app development project, isn’t it?
But the task is not finished yet. Launching your iOS app to the App Store is another task that you need to do properly.
You have to follow certain guidelines to ensure your app is successfully published on the App store. Otherwise, your app would be rejected and you have to wait and follow the same process again.
We know what problems most developers face while publishing their iOS app to the app store.
Therefore, in this guide, we will tell you how to submit your app to the App Store.
So Read till the end to know how to successfully launch your iOS app to the app store without any error in one attempt.
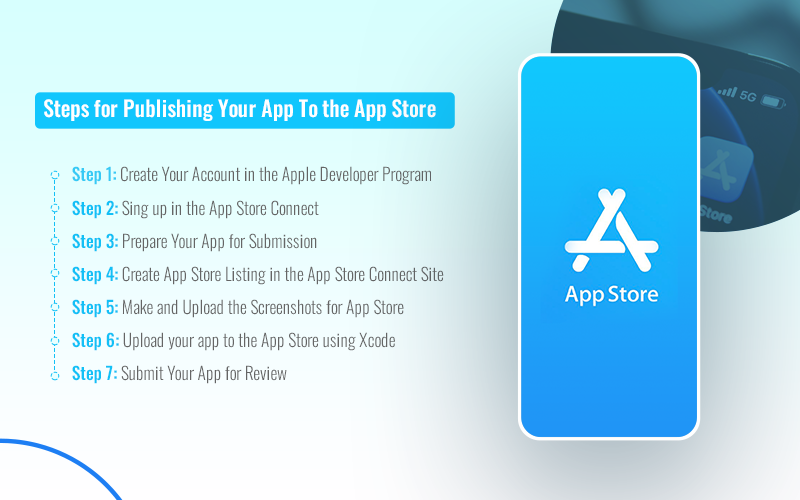
Step #1: Create Your Account in the Apple Developer Program
You need to sign up for the Apple Developer Program in order to publish your app to the app store. For this program, you will be charged $99/year and you will get access to a wide range of services that contain
- Accessibility to publishing apps to the App Store on all Apple platforms
- Access to building Safari extensions
- Get testing tools
- Facility for releasing beta versions
So when you enroll in the Apple Developer Program, you get a lot of benefits alongside the facility to submit your app to the App Store. However, don’t forget to renew this membership otherwise your app could be removed from the App Store.
Step #2: Sign Up in the App Store Connect
App Store Connect is Apple’s official website for publishing apps to the app store. It provides you access to operate the App Store. Here is how the App Store Connect dashboard looks
Step #3: Prepare Before Submit Your App to the App Store
. Understand the App Store Guidelines Accurately
Apple has certain guidelines to give the approval for submitting an app to the app store. Your app has to pass an app certification procedure. Therefore, to ensure your app successfully gets approval, you should read the App Store Guidelines thoroughly before publishing so you don’t make any technical or non-technical errors and avoid app rejection.
. Test Your iOS App and Remove Bugs
Apple has a dedicated team who reviews every iOS app which is listed to be launched in the App Store. They review an app to find any potential errors or bugs that may cause damage to a user’s device. They only allow the app to be published if they find it well and free from all errors or bugs.
Hence, you should conduct multiple rounds of tests to ensure your iOS app doesn’t have any bugs and is free from any flaws. You should check all aspects of the app such as its performance, user interface, size, store condition, network connectivity, OS compatibility, etc.
Step #4: Create Your App Store Listing
To submit your app to the app store, create your App Store listing. And for this, you need to follow the below process
- Log in to App Store Connect
- Go to the My Apps menu option and choose the “+” option to publish a new app.
Here you need to pay attention. If you want to update an existing or already published app, you need to follow the same process. But in the place of adding a new app, choose the option of the existing app.
. Fill out the App Information
Here, you have to fill in all the required information about your iOS app. Name, description, category, minimum age of the user, privacy policy, and supported URL. Here are the options that the app store will ask for
- App name
- Platforms
- Primary language
- BundleID
- SKU
In case, you are not sure as to what information to put in a particular column, you can use the “?” button. However, do check whether this option is available or not for the selected information-filling place.
App Privacy Policy
Your iOS app must have a privacy policy with live URL support. You can either use a Facebook page or build a whole new website to publicly show the privacy policy on the web for users.
However, if you don’t know how to write or create a privacy policy for your app, you can either take assistance from an iOS app developer. Or you can simply search on Google for App Privacy Policy for the app store.
Decide the Pricing of Your App
Here, you have to select the pricing of your app.
Decide the Release of Your App Versions
In this step, you have to choose how your app should be released once the app gets the approval for the app submission. There are three ways through which you can submit your app to the app store.
- Manually: Go to App Store Connect and release it manually
- Immediately: It will be released automatically once the app gets the certification from the app store.
- On a Date: The app will be published on a certain date after passing the certification.
Step #5: Make and Upload the Screenshots for App Store
Go through the guidelines mentioned for the required app store screenshots. The App Store asks for specific screenshots for different devices such as iPhone, Apple Watch, iPad, etc.
E.g. for iPhones, minimum of 3 screenshots up to 10 with 242 x 2688 pixels (portrait) or 2688 x 1242 pixels (landscape).
To make the app store screenshots, you can
Method 1: Use Raw Screenshots
It is an easier and faster way to take a screenshot for the required device screen size. By using the iOS simulator, you can navigate to the screen that you need and take a screenshot, and then click CMD+S on your keyword to save this in a PNG image file on your desktop computer. Now, you can upload this screenshot to the App Store Connect.
Method 2: Use a Mockup Template
For this, you need some graphic design tools like
- Figma
- Sketch
- Adobe Photoshop
Then, you need device mockups that allow you to create a mockup for a device screen. Below are popular tools that you can use for mock-ups
- Mockuphone
- Rotato
- Angle
- FluidUI
- Moqups
- AppCooker
Method 3: Make use of the App Store Screenshot Generator
If you are not confident in using graphic design tools and mockup tools. you can make use of the app store screenshot generator. This tool allows you to select a template and upload the screenshots which you took with the iOS simulator.
You can also add any text in this template. After this, you can export all your screenshots quickly. For this, you can use DaVinci Apps and Shotbot tools.
- Upload Screenshots to the App Store.
- To upload the screenshots, you need to do it in the app store listing.
Now, it’s time for the main action
Step #6: Submit Your App to the App Store Using Xcode
You might feel excited or a bit nervous at this stage as you are all set to upload the app. But before you begin this, check your app runs properly and it is free from all errors and bugs.
To upload your app, you need a signing and team information set up in Xcode since the app store allows the submission of the app in Xcode. You need to submit your app to the app store in the 1.0.0 version set for a whole new iOS mobile application.
This is a purely technical process. Hence, you should take assistance from a dedicated iOS app developer. And if you upload the updated version of the app, mention the increased build version of the app, e.g. 1.1.0
Publish the App
In this step, you will publish the app with Xcode. Previously, submitting the app with Xcode was a little time and effort-consuming. But with the latest Xcode version, it has become a simple and easy process.
To publish the app, go to Generic iOS Device option and create the full app archive.
Then,
Follow Product >> Archive and allow it to bundle your app. However, this process might take considerable time depending on your app size.
After this, a window screen will appear. It would be the Archive Window. From here, you can operate all the archives built by Xcode.
Xcode bundles a new archive whenever you choose Archive in the menu option. So better delete any duplicate or older archives from the list.
Once it is done, click the archive and select Distribute App. It will then show you options to choose the method of distribution.
Select the iOS App Store.
This process will go through some checks and validations to ensure your iOS app is not broken and free of any potential errors. However, if anything happens, Xcode will stop here and ask you to go back to coding and programming to make the required changes in the app.
And if Xcode doesn’t find any errors, the uploading process will go smoothly. And after the completion of this process, a final window will appear with a message showing, Congratulations! the app is successfully uploaded.
Step #7: Submit Your App for Review
Once your app has been successfully uploaded to the app store, you now have to wait for an email about your archive has been processed and ready to be used.
Now, go to App Store Connect>>click the save button. After selecting this button, the “Submit for Review” button becomes blue.
You will see a set of questions regarding your app. After this, your app will be sent to Apple’s Certification and Review team on the waiting list. It will be shown in a yellow tag “Waiting for review”.
Then, you have to wait for getting the email about the approval of your app.
And once you receive the email, that’s it, your app has been officially approved and launched on the app store.
App Store Submission Checklist
- Ensure your iOS app does not crash
- Free from bugs
- App is compliant with the Apple’s Human Interface Guidelines
- Fill out all the app submission information
- Upload the screenshots as per specific device requirements.
- Make sure the app doesn’t violate user privacy and copyright rules
Conclusion
We hope this article has given you helpful information about successfully submitting the app to the app store. This entire process may take some time and technical effort. But if you carefully understand all the guidelines and ensure your app is free from any potential errors, it will be a smooth process to submit your app to the app store.
However, if you need any type of assistance in your iOS app development, MobileCoderz can help you in every process. We have the industry’s best iOS app development company and business analysts who can assist you create and launch a seamless and flawless iOS app easily and cost-efficiently.
-
 How Much Does it Cost to Build an MVP App in 2024?
 -
How Does E-Commerce App Development Help Retailers With Their Problems in the Retail Industry?
-
How AI is Changing the Landscape of the Online Food Delivery Industry?