How To Build A Weather Application With React And React Hooks? – Complete Guide
Share :


React has the power to build a feature-rich weather app.
It is a fully-functional front-end JS library that is used to create feature-rich and dynamic user interfaces and applications. React provides a high-standard front-end development support to create an awesome user interface and useful features for web or mobile applications.
If you know how to intelligently use React and React Hooks, you can make a full-fledged weather app for your target audience. In this blog, we will give you a brief React app development tutorial for creating a weather app using React’s latest hooks.
By the end of this blog, you will learn about React’s most common hooks and how to create eye-catching and custom features that your users find helpful.
If you are a ReactJS developer or app founder who wants to build a high-quality weather application, this developer tutorial will guide you on how to effectively use this technology.
So let’s start then
Before we start, we hope you must be familiar with the ReactJS framework. But since we are going to use React Hook in this process, so you should know the basics of
What are React Hooks?
Hooks are the latest addition to the React 16.8 version. These hooks allow developers to use state and other React features without writing a class. React Hooks are APIs that enable React functional components to use React features. This function was previously only available in react class components.
React hooks solves the problems of using React class components which makes the development process much easier and simpler than before. And this updated feature is highly useful in weather app development.
Installation of npm and Node
To construct React apps, there is a requirement of the run-time atmosphere which is termed as Node. This is predominantly used to carry out the coding of JavaScript.
You’ll additionally require the package manager termed “npm” which is developed on Node. One can utilize it for the installation of packages for the Javascript apps. Luckily it accompanies Node, hence you do not have to download it independently.
When you are done, open your type node- v and command or terminal. It will give you an idea about what variant of Node you have.
Most Effective Method to Develop a Weather Application Using React
To develop a React app, you must first write the following line in the depot “npx create-react-app my-weather-app”.
You will be notified about the installation of packages.
After the installation, go to the file “project” and tap “npm start”.
You can witness the template that is default as shown in the image below:-
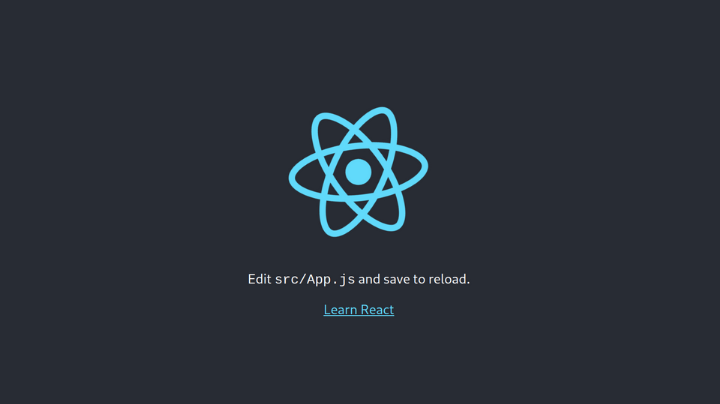
The Boilerplate Template of Default React, Source: freecodecamp.org
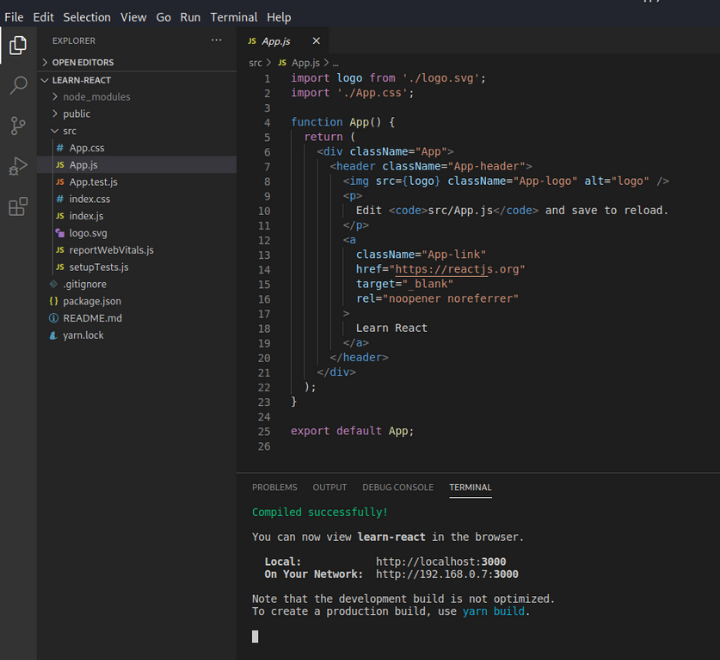
App.js, Source: freecodecamp.org
In this case, we do not have to bother about the entire function. So, let’s ahead propel into some coding.
In your file “app.js”, make sure that you clear everything inside the div tag. Eliminate the import of the logo.
After this process, you will observe a blank screen.
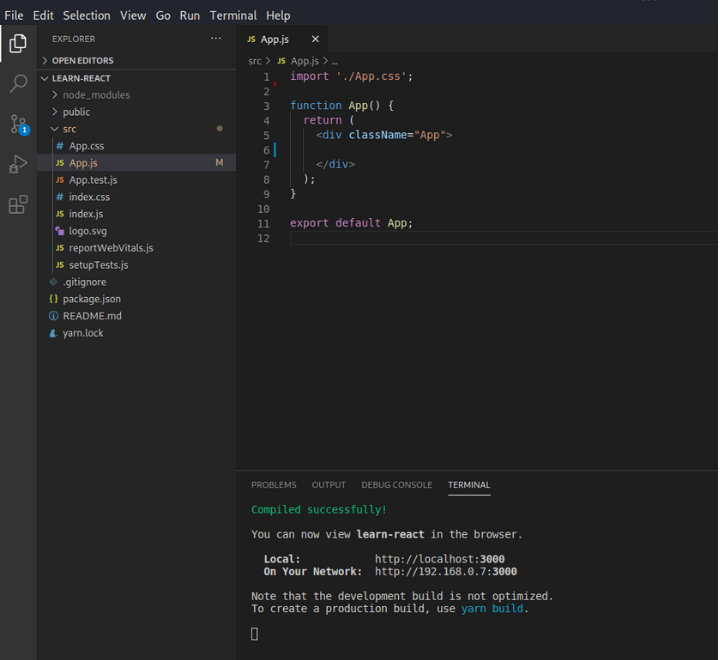
After the clean up of App.js, Source: freecodecamp.org
Installation of Packages
For making this app additionally appealing, you must install the packages that are external. For this, you require a Semantic React UI library.
In the terminal type the below-mentioned command,
npm install semantic-ui-react semantic-ui-css.
Once the installation is complete, the library must be imported in index.js and paste the command “ import ‘semantic-ui-css/semantic.min.css” in the file index.js.
There is also the requirement of moment.js to format the timing. You can install it by utilizing the “ npm install moment –save” command.
To keep a track of all the packages that are installed, you can see the package.json file.
Package.json, Source: freecodecamp.org
Development of Weather Apps
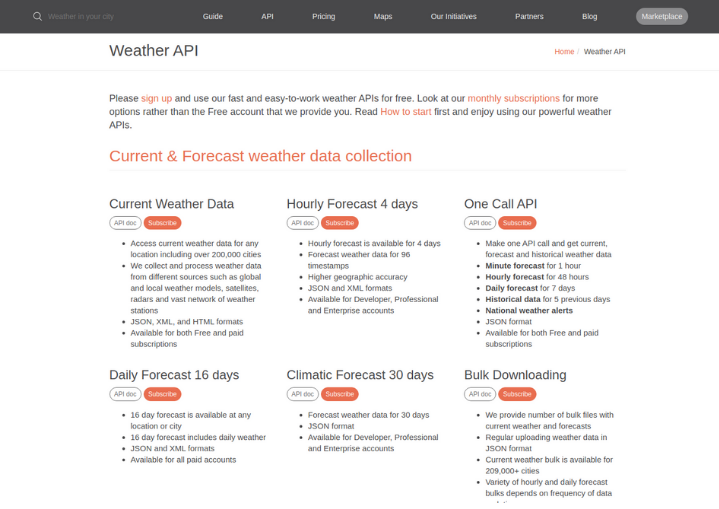
For properly operating your weather application, we require OpenWeatherMap, an API from a third-party platform that will obtain the data related to weather.
Once you create your account, check for the options of API click on the Navigation bar. You can see various alternatives such as Hourly 4 hour forecasts, Current Weather Data, 16-day forecasts, etc. These are the endpoints of the API and you must ensure to fetch the data for these sections.
Source: freecodecamp.org
Now, the next thing you require is a key API to declare these (check the image above for this) APIs. To have your key API, you must click the username on the right top corner and afterwards check on “my API keys“.
If the API key does not exist make sure you develop one. For this, all you have to do is develop a field named .env. This you can see in the folder of the main app. This folder will be an environmental variable and will enclose all the information related to your keys and endpoints.
REACT_APP_API_URL = 'https://api.openweathermap.org/data/2.5'
REACT_APP_API_KEY = Paste your API key here.
REACT_APP_ICON_URL = 'https://openweathermap.org/img/w'
Source: freecodecamp.org
In the variable REACT_APP_API_KEY make sure you paste all the key API that is copied.
Utilization of React Hooks
With the help of React Hooks, you can accomplish and utilize all the state in the components that are functional.
For instance, here, in this case, we will be using useEffect and useState hooks and will pitch at the top.
The next phase is to develop two states. One will be for longitude and the other for latitude.
const [lat, setLat] = useState([]);
const [long, setLong] = useState([]);
Source: freecodecamp.org
Now develop the function “useEffect”. Now the main function of this is to load the functionalities when the app is reloaded or loaded.
useEffect(() => {
    navigator.geolocation.getCurrentPosition(function(position) {
      setLat(position.coords.latitude);
      setLong(position.coords.longitude);
    });

    console.log("Latitude is:", lat)
    console.log("Longitude is:", long)
  }, [lat, long]);
Source: freecodecamp.org
Using the navigator. geolocation, you can get the longitude and latitude, ensure to use setLat and setLong to set the states of latitude and longitude.
import './App.css';
import React, { useEffect, useState } from "react";
export default function App() {

  const [lat, setLat] = useState([]);
  const [long, setLong] = useState([]);

  useEffect(() => {
    navigator.geolocation.getCurrentPosition(function(position) {
      setLat(position.coords.latitude);
      setLong(position.coords.longitude);
    });

    console.log("Latitude is:", lat)
    console.log("Longitude is:", long)
  }, [lat, long]);

  return (
    <div className="App">

    </div>
  );
}
app.js, Source: freecodecamp.org
Below mentioned (in the image) is an example of how the console will look with the values of longitude and latitude.
Latitude is: 25.5922166
Longitude is: 85.12761069999999
Source: freecodecamp.org
Using The Longitude & Latitude For Getting The Current Location
You must craft another functionality get Weather. From the Weather API, it will attain the data of the weather that is based on the longitude and latitude.
In this functionality, you can utilize a fetch call to attain the data from the API. The following command process.env .REACT_APP_API_URL will get your API address and process.env. REACT_APP_API_KEY will get your key API from the .env document. The log & lat are the longitudes and latitude that you have seen beforehand.
And afterwards, you must ensure to modify the data into the format JSON.
In the subsequent stage, we must ensure to utilize setData. This will store all the outcome into the object “data”.
await fetch(`${process.env.REACT_APP_API_URL}/weather/?lat=${lat}&lon=${long}&units=metric&APPID=${process.env.REACT_APP_API_KEY}`)
      .then(res => res.json())
      .then(result => {
        setData(result)
        console.log(result);
      });
And you can log in to the data that is there in the console.
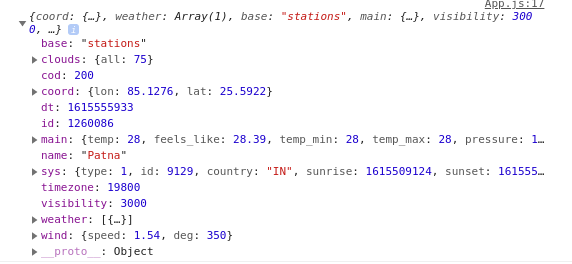
Source: freecodecamp.org
Here, you can get the details of the weather data based on Longitude and Latitude.
Creation of The Components of The Weather
Now, the next step is to develop the components of the weather where you can display the data. In the folder src, make sure to develop a folder named “Components” and develop the file named “weather.js” in that folder.
Next, you need to transfer these components of weather into the file named “app.js”.
import './App.css';
import React, { useEffect, useState } from "react";
import Weather from './components/weather';
export default function App() {

  const [lat, setLat] = useState([]);
  const [long, setLong] = useState([]);
  const [data, setData] = useState([]);

  useEffect(() => {
    const fetchData = async () => {
      navigator.geolocation.getCurrentPosition(function(position) {
        setLat(position.coords.latitude);
        setLong(position.coords.longitude);
      });

      await fetch(`${process.env.REACT_APP_API_URL}/weather/?lat=${lat}&lon=${long}&units=metric&APPID=$
{process.env.REACT_APP_API_KEY}`)
      .then(res => res.json())
      .then(result => {
        setData(result)
        console.log(result);
      });
    }
    fetchData();
  }, [lat,long])

  return (
    <div className="App">

    </div>
  );
}
Importing the component of weather in app.js file, Source: Source: freecodecamp.org
In the image, you might have seen the return statement. If the data type is undefined, it will display the empty div.
Source: freecodecamp.org
Creation of The Weather Body
In this section, you are going to utilize the user interface library of the Semantic to design the interface.
Now, develop the card that will demonstrate the information related to weather.
Below mentioned (in the image) is an example of how the console will look with the values of longitude and latitude.
import React from 'react';
import './styles.css';
import { Card } from 'semantic-ui-react'

const CardExampleCard = ({weatherData}) => (
  <Card>
    <Card.Content>
        <Card.Header className="header">{weatherData.name}</Card.Header>
    </Card.Content>
  </Card>
)

export default CardExampleCard;
Weather.js, Source: freecodecamp.org
The next stage is to value the card from the semantic-ui-react, and inside this card, the header will display the name of the city. For this, you can utilize the props to React.
You can use this to send the data from the component of the parent to the component of the child.
<Weather weatherData={data}/>Source: freecodecamp.org
The next step is to pass the data with the name “Weather.js” of the props as weatherData.
import React from 'react';
import './styles.css';
import { Card } from 'semantic-ui-react'

const CardExampleCard = ({weatherData}) => (
  <Card>
    <Card.Content>
        <Card.Header className="header">{weatherData.name}</Card.Header>
    </Card.Content>
  </Card>
)

export default CardExampleCard;
Source: freecodecamp.org
For example, the current location in Patna

Source: freecodecamp.org
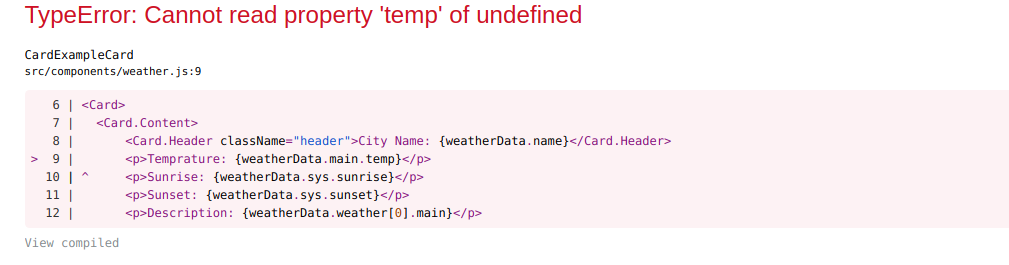
You can adjoin more sections to the components of the weather.
import React from 'react';
import './styles.css';
import { Card } from 'semantic-ui-react'

const CardExampleCard = ({weatherData}) => (
  <Card>
    <Card.Content>
        <Card.Header className="header">City Name: {weatherData.name}</Card.Header>
        <p>Temprature: {weatherData.main.temp}</p>
        <p>Sunrise: {weatherData.sys.sunrise}</p>
        <p>Sunset: {weatherData.sys.sunset}</p>
        <p>Description: {weatherData.weather[0].description}</p>
    </Card.Content>
  </Card>
)

export default CardExampleCard;
Source: freecodecamp.org
Here, you can get updates related to descriptions, sunset, sunrise, and temperature from the API.
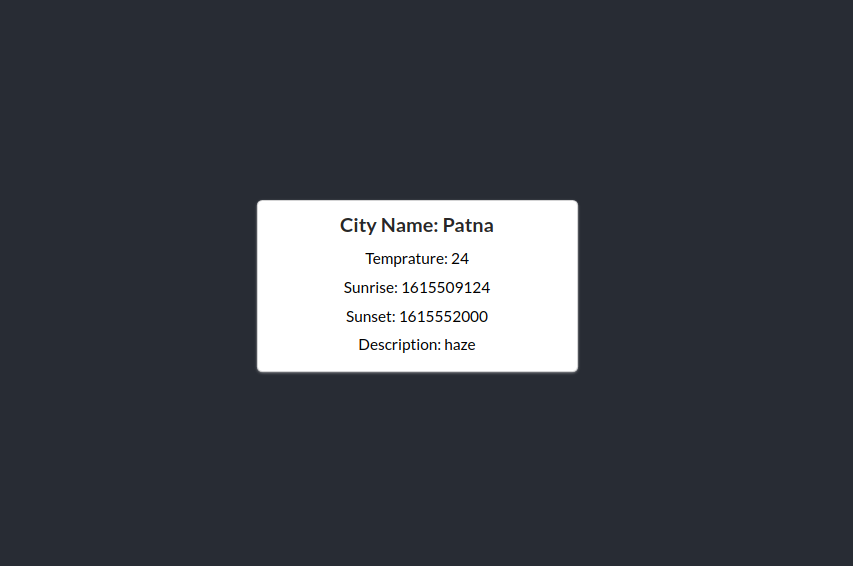
Source: freecodecamp.org
In this stage, you can also add sections such as visibility, humidity, wind speed, etc.
Formatting The Data & Addition of Today’s Time & Date
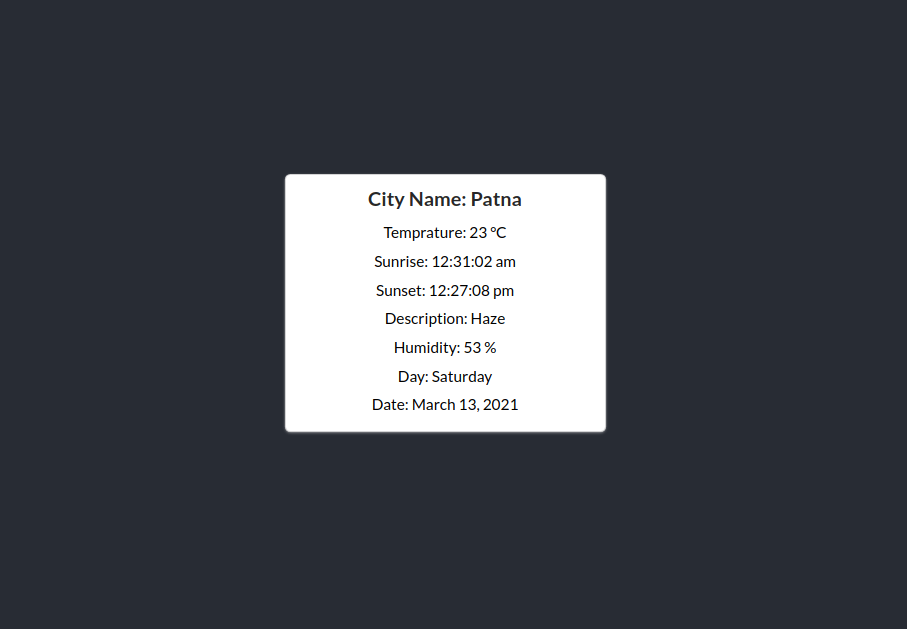
Make sure you add the temperature unit. Then, you can add °C after the temperature. Make sure to change the local time according to sunset and sunrise.
import React from 'react';
import './styles.css';
import { Card } from 'semantic-ui-react'
const CardExampleCard = ({weatherData}) => (
<Card>
<Card.Content>
<Card.Header className="header">City Name: {weatherData.name}</Card.Header>
<p>Temprature: {weatherData.main.temp} °C</p>
<p>Sunrise: {new Date(weatherData.sys.sunrise * 1000).toLocaleTimeString('en-IN')}</p>
<p>Sunset: {new Date(weatherData.sys.sunset * 1000).toLocaleTimeString('en-IN')}</p>
<p>Description: {weatherData.weather[0].main}</p>
<p>Humidity: {weatherData.main.humidity} %</p>
</Card.Content>
</Card>
)
export default CardExampleCard;Source: freecodecamp.org
Next, you can add today’s date and days utilizing moment.js.
import moment from 'moment';

<p>Day: {moment().format('dddd')}</p>
<p>Date: {moment().format('LL')}</p>
Using moment.js, Source: freecodecamp.org
The most appreciated part about this package is it will update the date and day automatically.
Your screen will display the following:-
import React from 'react';
import './styles.css';
import { Card } from 'semantic-ui-react';
import moment from 'moment';
const CardExampleCard = ({weatherData}) => (
<Card>
<Card.Content>
<Card.Header className="header">City Name: {weatherData.name}</Card.Header>
<p>Temprature: {weatherData.main.temp} °C</p>
<p>Sunrise: {new Date(weatherData.sys.sunrise * 1000).toLocaleTimeString('en-IN')}</p>
<p>Sunset: {new Date(weatherData.sys.sunset * 1000).toLocaleTimeString('en-IN')}</p>
<p>Description: {weatherData.weather[0].main}</p>
<p>Humidity: {weatherData.main.humidity} %</p>
<p>Day: {moment().format('dddd')}</p>
<p>Date: {moment().format('LL')}</p>
</Card.Content>
</Card>
)
export default CardExampleCard;Weather.js, Source: freecodecamp.org
And the final output will be displayed as below:-
Source: freecodecamp.org
Styling The Weather App
After the development, the next stride is to do the styling to make the application more alluring.
The first thing is to colossal the card, change the radius of the border, colour, font of the cooler and remove the alignment of the text.
import React from 'react';
import './styles.css';
import moment from 'moment';
const CardExampleCard = ({weatherData}) => (
<div className="main">
<p className="header">{weatherData.name}</p>
<div>
<p className="day">Day: {moment().format('dddd')}</p>
</div>
<div>
<p className="temp">Temprature: {weatherData.main.temp} °C</p>
</div>
</div>
)
export default CardExampleCard;Weather.js, Source: freecodecamp.org
@import url('https://fonts.googleapis.com/css2?family=Recursive&display=swap');

.main{
    width: 700px;
    border-radius: 15px;
    background-color: #01579b;
}

.header{
    background-color: #424242;
    color: whitesmoke;
    padding: 10px;
    font-size: 28px;
    border-radius: 15px;
    font-family: 'Recursive', sans-serif;
}

.day{
    padding: 15px;
    color: whitesmoke;
    font-family: 'Recursive', sans-serif;
    font-size: 24px;
    font-weight: 600;
}

.temp{
    padding: 15px;
    color: whitesmoke;
    font-family: 'Recursive', sans-serif;
    font-size: 18px;
}
Styles.css, Source: freecodecamp.org
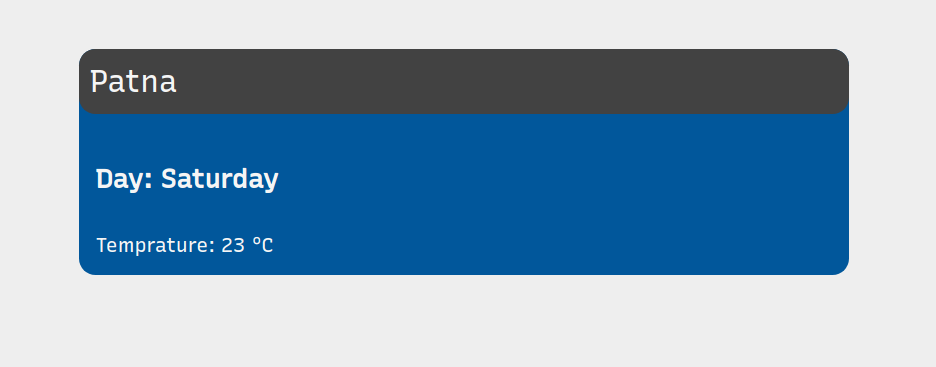
Source: freecodecamp.org
Now, it is how the application will look like. You can utilize the flexbox to organize the data list-wise.
<div className="flex">
<p className="day">Day: {moment().format('dddd')}</p>
</div>
<div className="flex">
<p className="temp">Temprature: {weatherData.main.temp} °C</p>
</div>Source: freecodecamp.org
Make sure you designate the divs named ‘flex’ and include the subsequent equity in styles.css.
.flex{
    display: flex;
    justify-content: space-between;
}
Source: freecodecamp.org
The weather.js will now appear like this.
import React from 'react';
import './styles.css';
import moment from 'moment';
const CardExampleCard = ({weatherData}) => (
<div className="main">
<p className="header">{weatherData.name}</p>
<div className="flex">
<p className="day">Day: {moment().format('dddd')}</p>
<p className="day">{moment().format('LL')}</p>
</div>
<div className="flex">
<p className="temp">Temprature: {weatherData.main.temp} °C</p>
<p className="temp">Humidity: {weatherData.main.humidity} %</p>
</div>
</div>
)
export default CardExampleCard;Source: freecodecamp.org
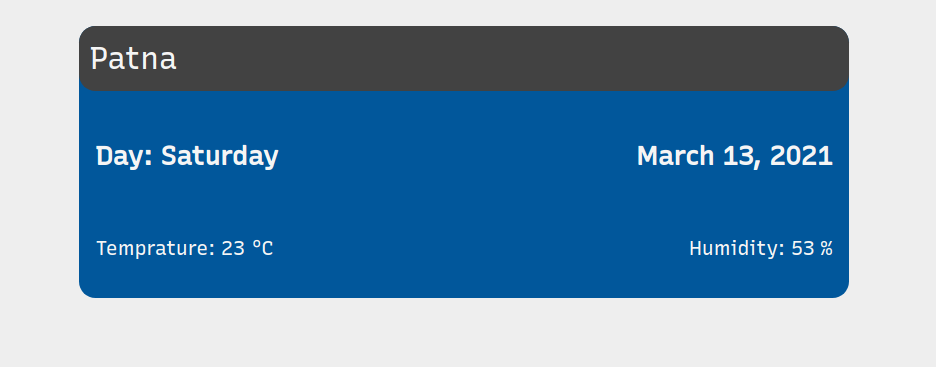
Source: freecodecamp.org
You can add the following fields that are remaining.
import React from 'react';
import './styles.css';
import moment from 'moment';
const WeatherCard = ({weatherData}) => (
<div className="main">
<p className="header">{weatherData.name}</p>
<div className="flex">
<p className="day">{moment().format('dddd')}, <span>{moment().format('LL')}</span></p>
<p className="description">{weatherData.weather[0].main}</p>
</div>
<div className="flex">
<p className="temp">Temprature: {weatherData.main.temp} °C</p>
<p className="temp">Humidity: {weatherData.main.humidity} %</p>
</div>
<div className="flex">
<p className="sunrise-sunset">Sunrise: {new Date(weatherData.sys.sunrise * 1000).toLocaleTimeString('en-IN')}</p>
<p className="sunrise-sunset">Sunset: {new Date(weatherData.sys.sunset * 1000).toLocaleTimeString('en-IN')}</p>
</div>
</div>
)
export default WeatherCard;Weather.js, Source: freecodecamp.org
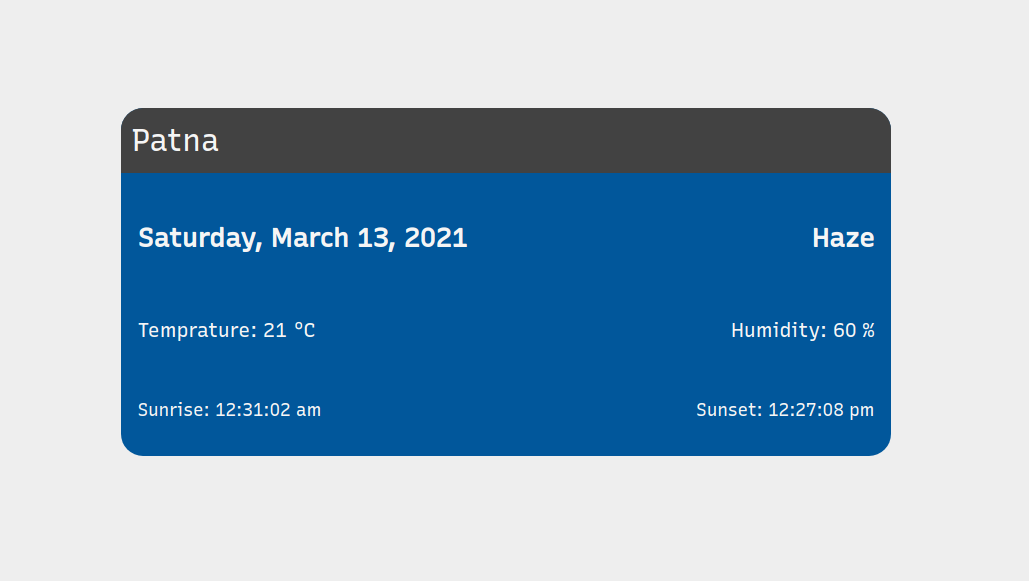
Source: freecodecamp.org
Addition of The Refresh Button
import React from 'react';
import './styles.css';
import moment from 'moment';
import { Button } from 'semantic-ui-react';
const refresh = () => {
window.location.reload();
}
const WeatherCard = ({weatherData}) => (
<div className="main">
<div className="top">
<p className="header">{weatherData.name}</p>
<Button className="button" inverted color='blue' circular icon='refresh' onClick={refresh} />
</div>
<div className="flex">
<p className="day">{moment().format('dddd')}, <span>{moment().format('LL')}</span></p>
<p className="description">{weatherData.weather[0].main}</p>
</div>
<div className="flex">
<p className="temp">Temprature: {weatherData.main.temp} °C</p>
<p className="temp">Humidity: {weatherData.main.humidity} %</p>
</div>
<div className="flex">
<p className="sunrise-sunset">Sunrise: {new Date(weatherData.sys.sunrise * 1000).toLocaleTimeString('en-IN')}</p>
<p className="sunrise-sunset">Sunset: {new Date(weatherData.sys.sunset * 1000).toLocaleTimeString('en-IN')}</p>
</div>
</div>
)
export default WeatherCard;Weather.js, Source: freecodecamp.org
.button{
    width: 35px;
    height: 35px;
}
Styles.css, Source: freecodecamp.org
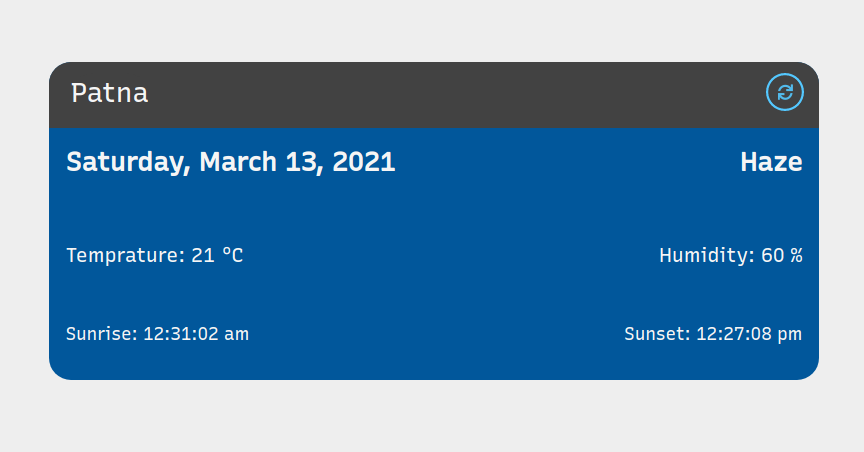
You will be displayed with the button and this will prompt you to refresh the functions. When you push this further, it refreshes the pages.
To Wrap Up
So, that’s it!!! You are done. If you want, you can also add other features like icons, forecasts, etc., to the application.
If you want more ideas get in touch with MobileCoderz. We are a leading React development company that provides high-quality web and mobile solutions for any app concept.
Got something in mind?
-
 How Much Does it Cost to Build an MVP App in 2024?
 -
How Does E-Commerce App Development Help Retailers With Their Problems in the Retail Industry?
-
How AI is Changing the Landscape of the Online Food Delivery Industry?